This is part four in our series on how to create a JAMStack e-commerce site with Nuxt 3, Strapi 4 and Snipcart. We will line all the dots up and connect our shop to Snipcart.
Almost there gals and guys! This has been a fun little project for us to do. We’ve learnt a lot ourselves doing the YouTube videos, talking on camera isn’t something that comes naturally to me, but we hope you’ve found it useful. This episode is short and sweet, just like me 🍭🤣 ! This is the final part of this series where it will all come together and your shop will be ready to go. We’re going to connect Snipcart and make it so you can actually buy a sick candle!! Wooooooo, do I hear you all say? If you have no idea what I’m talking about (most people don’t) then here’s the previous episodes in this series:
So as I said this is the is the final step to our shining bright candle shop - Pick a Sick Wick! Snipcart is an e-commerce solution that is fully flexible and works great with JAMStack sites. It’s a dream for designers and devs unlike a lot of things out there! It’s super easy to integrate and all the hard work of setting up a cart and checkout is handled for you. It’s absolutely tropical.
If you don’t have a Snipcart account, then go ahead and create one, it’s very simple you just need to sign up and verify your account.
We now need to import the Snipcart scripts into the head of our pages in our Nuxt 3 frontend. We do this by adding the links and scripts to our Nuxt config. It should now look something like this:
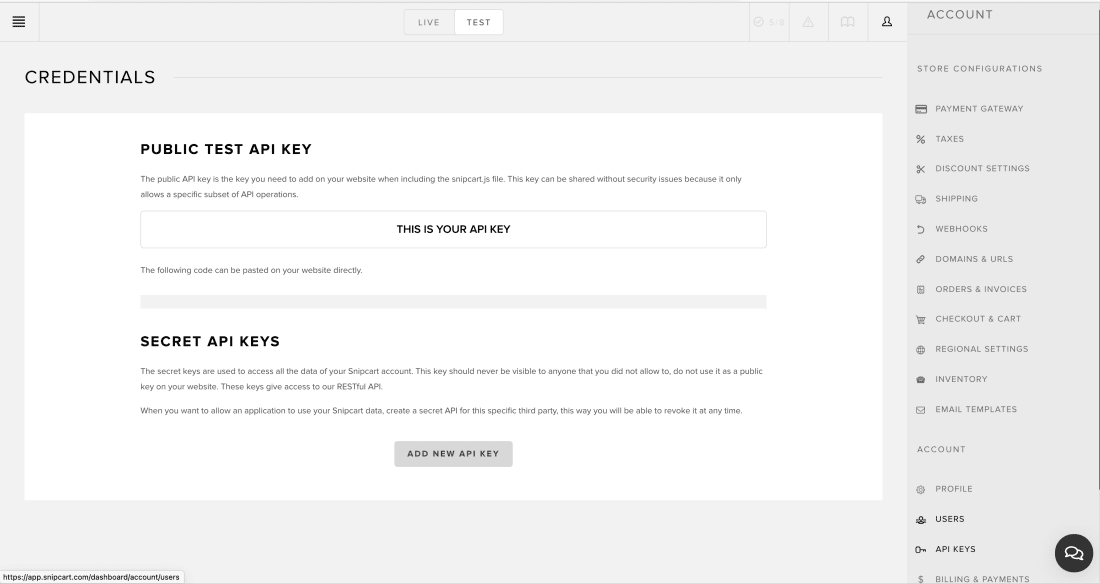
Next, we need to add a div with your Snipcart API key, you can find the API key in your account dashboard in Snipcart. If you click the user icon on the top left and >
API keys
Snipcart API key 🔑
Now, we need to include Snipcart let Snipcart know who we are by adding a special div to all out pages. We will add the div to our layout page so it appears on all pages. The <div> should be hidden and look like so:
Believe it or not, we’re not far off!!
Now we want add a class and some other bits to the Add to basket button that’s inside the pages/products/[id].vue .
The snipcart-add-item class added informs Snipcart that it should react to that element's click event and add it to the basket. Then the data attributes bind all the product details to Snipcart including the price, description, quantity etc. When a product is added to the cart, the checkout will automatically come out and will be all styled using the stylesheet we added earlier.
The image URL that Strapi gives back is relative, so we need to make it absolute and build up the URL, therefore we’ve created a computed property.
Finally one thing to note, is the quantity ref that we pass to the InputField. This is using the new composition API and gives us a reactive variable, it’s fewer lines of code compared to when we would write it in the Options API. Your product page should now look like this:
Finally, let’s go and add the cart total to the CartInfo.vue component. This will automatically update when new products are added to the cart.
The snipcart-checkout class will add a button to open up the cart whenever it’s clicked, and the snipcart-total-price class added to the span lets Snipcart no where to place the total price of your basket. Easy right?
One other thing we need to do is make the Snipcart modal container have a higher z-index so the website header doesn’t go above it and hide the checkout. So in your app.vue just add this into your styles section:
So that should be all you need! Lets take a look at it :
Your cart in the top right should now have the total next to the basket.Here’s your cart summary and checkout 🙂
And that's all! Easy peasy!
Thank you so so much for reading, if you have any questions please give us a shout @pixelhopio.. If you would like any more tutorials also just let us know what kind of ones you would like. It’s something we’re really enjoying and would like to do more of.
Creating an internationalised site with Strapi and Nuxt
We were really excited when Strapi released a new update a few weeks ago that included internationalisation! This post will show you the basics of creating an internationalised site using Strapi and Nuxt.
Dynamic social images with Nuxt, Cloud Functions and Cloudinary
Every little helps when trying to get your content noticed on social media, and having an eye-catching sharing image could be the difference between getting someone passing you by or someone clicking through.
This post will guide you by creating dynamic social sharing images unique to each page/post using Firebase cloud functions, Cloudinary and Nuxt.