This is part two in our series on how to create a JAMStack e-commerce site with Nuxt 3, Strapi 4 and Snipcart. We will build out the site’s structure, layout and any components we need in the process.
Well, fancy seeing you here, either you've accidentally stumbled across this Wahay, it looks like you've made it to the second blog post of the series, well I never, thank you ever so much for joining again. Alternatively you might have accidentally stumbled here, if that's the case and you're intrigued by what you've seen then you can skip back to the previous blog post and start building your very own candle shop 😉.
In the last blog post we set up Strapi 4- we created a collection type and added in some products, made them public so we can get them from the Nuxt 3 frontend.
We will build out the site's structure, layout, and some of the components needed during this blog post. Then, in the next blog post, we will pull through the products, create components for them, and build out more of the site.
You can watch the video or follow along below.
Here's a reminder of the code if you would like to dive straight into it, we have created example repositories for both the Nuxt and Strapi parts:
Nuxt 3 Setup
To get started today we're going to add in an .env file we're doing this so that we can easily change the API URL in one place, then when we deploy it we can easily change it to the production endpoint.
Adding in environment variables in Nuxt 3
Also we need to update the nuxt.config.ts. Any environment variable we want to use in our frontend Vue code you have to tell Nuxt to expose. You do this by adding it to the publicRuntimeConfig object, like below:
Later on, you can access these variables in your components by using the useRuntimeConfig composable.
Now restart and check everything is still working.
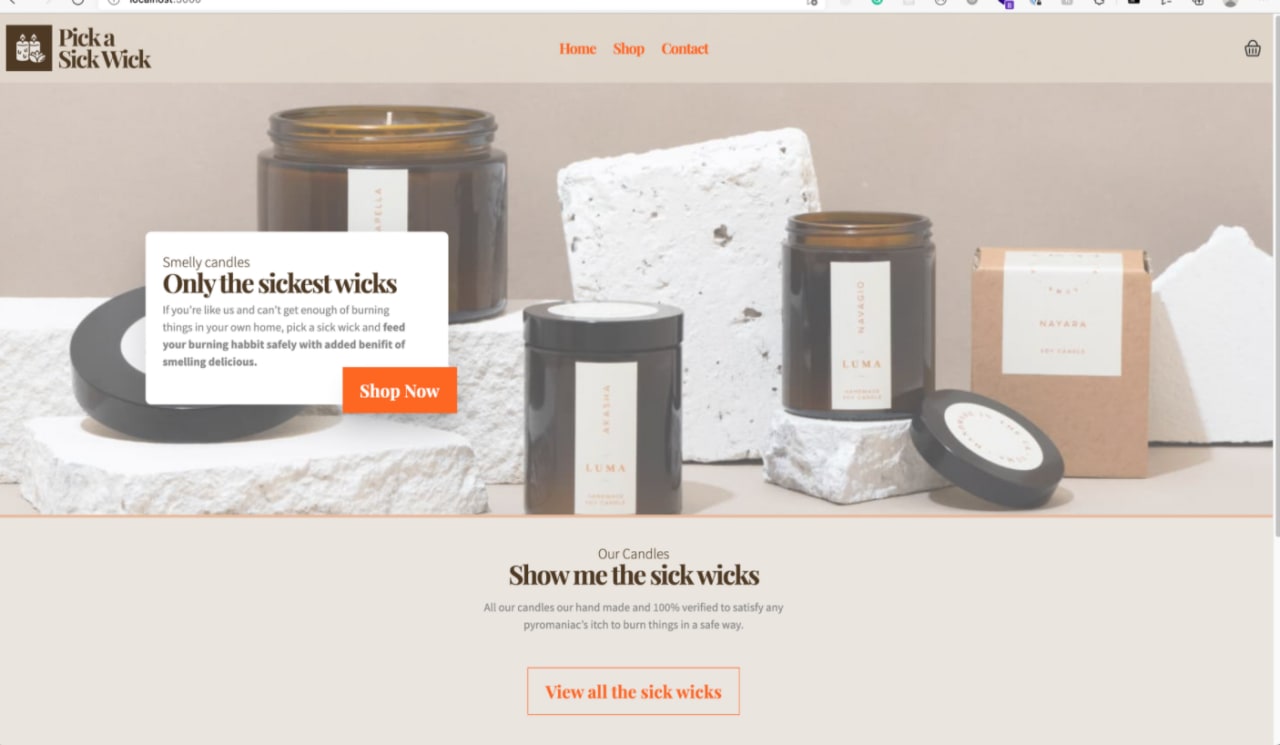
Here's a reminder of what the design looks like, we'll be building this out to match it:

Also here is a link to the Figma file.
Creating our main layout
So open up the terminal and get the frontend and backend running.
Next let's start working through the designs and building out each section, first we'll build out the layout and within this, there will be the header, main and footer sections.
Create a directory called layouts with a file called default.vue in it, this will be your default layout template. If you're familiar with Nuxt 2 then this won't look much different. The content from the index.vue page will come out in the slot here. Here we're just setting the default fonts and background colours with the Tailwind theme classes.
The -webkit-font-smoothing changes the rendering of the font to make it match the design
Next we are going to build out the header component, which will be made up from a number of child components. There's a few elements that will look something like this:
- Header
- Logo icon
- Desktop Menu
- Cart Price
- Cart icon
- Mobile menu
Let's create a component for our logo, first create a directory in the root called components, then a file called logo.vue :
Now let’s build out the desktop navigation, they aren't going to link yet because that will break the site. Create a file called NavBar.vue in the components directory.
We now need to create the CartInfo.vue component , in the next post we will be adding in the cart total but for now we're just going to have the icon in there.
Next up we will build our main header component that will be made up of the child components we just created.
Now we can pull this into our default.vue layout, and just test we are pulling in the header correctly, it will look something like this:
In the HeaderSection.vue we can now import the components that we built earlier. The way that I would usually do this is by adding in 1 by 1 at a time and just go check the frontend to check everything is okay. But for ease I've just added them all in straight away:
Nuxt 3 auto import components
You'll see here you don't need to import components and declare them like you used to. Nuxt 3 auto imports components for you. Which makes components quicker to write, less crowded and easier to read. If you have your component inside a nested directory like this :

Then the name of the component inside your template will be named like this <IconsCart />.
Let's go and check everything looks as it should:

Before we move on we're going to add in the mobile menu. Add in a new file into the components directory called MobileMenu.vue
Using the Vue 3 composition API
useRoute allows us to get the current route and the defineEmits basically tells the component that it can emit an event called close, then we use the watch API to emit the close event whenever the route changes. The mobile menu will close when you change routes.
Next, we are going to update our HeaderSection.vue to pull in the MobileMenu.vue, add some transitions to it and hide the desktop menu. So open up your HeaderSection.vue and your code should now look like this:
Now let's just go and tidy up the app.vue , add in the background colour and add a meta title.
Nuxt 3 Meta components
It's now really easy to add in a meta title and other meta elements in Nuxt 3, thye have made a number of conponents that oyu can use in other components and it will add to your pages meta. In this case we're just using the title component to add a title to our site.
Wooo we're in a good place to start building out the rest of the site. Lets start adding a few components that are useful in any site.
Creating a heading component
Adding a heading component like this means you all your headings will match your design system perfectly. So lets go ahead and create our heading.vue inside the components directory.
This is handy for keeping all heading styles consistent, and means you only have to change them in 1 place rather than multiple.
If you're using the <script setup> you create your props by using the defineProps function.
Container component
We normally create a Container component in any site. It helps us consistently size, horizontally centre and add padding to its children. Lets add that into the components directory and should look like this:
Button component
Every project needs a button component, so let's go ahead and add that with it's two different styles. We pass in a theme prop that then is used to choose the set of classes that should be applied using a computed property. Here we will have multiple classes that apply to each of the button themes.
Right! Time to build out the footer, create a file in your components directory called footer.vue that will look something like this:
Lets import them into the layout and check they're working, your default.vue should look something like this
Then your frontend should look like this:

Let's go update the juicy parts of the site, the main content. First we're going
Add a couple of new directories assets/images into the route of the director. Inside this we need to add in our main image that's going to sit at the top of the homepage.

Next update the index.vue
Okay great, you should now have something that looks like this now
Yayyy! One step closer to getting that shop of yours set up. That's the end of this tutorial, we hope it's been helpful and you've got a lot from it, if you have any questions feel free to get in touch and ask any more questions via our website or Twitter. Thanks for taking the time to read it. The next one is going to be about getting the products in from Strapi and it will be out very shortly. You can also subscribe to our newsletter on the right hand side of the page.
Thanks again! 👋 😘
Want to respond?
13 Likes
2 Reposts
5 Replies