In this post we will show you how to transform your body into a skeleton in realtime by analysing a webcam feed with TensorFlow.js and pose detection. For maximum spooky effect we recommend following this tutorial in the dead of night on 31st October.
We recently built a fun halloween experiment where we use something called pose detection to skeletonise your body in realtime using your body.
In this post we will show you how you can create something similar using TensorFlow.js and pose detection models. Take a look here to see what you will build: https://skeletoniser.netlify.app
If you are prefer these sort of guides in video formats we've got you covered too:
What is pose detection?
What in the world is pose detection, and why might I want to use it? Well in simple terms, it's the process of taking an image or video, locating any bodies in the frame, and then figuring out where their body parts are.
What is pose detection good for? Well it will probably have loads of real world uses! You could use it to create a Yoga app that detects when you are in the correct pose. You could use it to analyse your running technique and provide feedback. You could use it to create interactive art installations. In our case, we decided to test it out on probably the most important use case of all... turning you into a skeleton of course!
We will be using Vite to bundle our project and run a dev server, so start a new project with:
Starting the webcam
So before there's any chance of skeletonising happening, we need something to skeletonise! The first thing we need to do is grab the feed from a webcam to see the ghosts your body.
Creating HTML to display the webcam feed
To see the web cam we first need to add a HTML element that is capable of displaying it. The <video> element is the perfect tool for the job. Update your index.html to contain a video element like below. (Delete the existing <div id="app"></div>)
Let's quickly talk few the attributes we have added to the video element. Firstly we have added playsinline. This attribute tells mobile browsers that video should play inline on the page rather than their default behaviour of opening up in fullscreen.
The second attribute is autoplay="true". This one does what it says on the tin and means the video element will play automatically as soon as a video is available rather than being paused by default.
Now that we have a video element let us reference it to use it in our code later. Modify src/main.ts to look like the following:
You might notice the ! after the querySelector call. This tells Typescript that the video element will definitely exist, so we don't need to account for the chance it could be missing in the code we write later.
Requesting access to the webcam and attaching to the video element
Our video element is all set up, and we have a reference to it. The next step is getting some media to play on it. To do that, we need to request a MediaStream.
When we call the initCamera function, the user will be prompted to allow access to their webcam. We pass an options object to the getUserMedia function.
Specifying the facingMode property in the video object lets the browser know that it should choose the camera facing the user if there are multiple cameras. On mobile devices, this should mean the selfie camera is selected by default.
We also specify width and height parameters. This tells the browser the ideal dimensions of the video we want to receive. In this case, we have chosen to limit it to 640x480 if possible so that the pose detection will be efficient. The bigger the video, the more resource-intensive the pose detection will be, so 640x480 is a happy medium.
After getting the stream, we can then assign it to the video element we created earlier. Before we do that, we make a new promise that will allow us to wait for the video to completely load before resolving. After assigning a video a media stream, it takes time to initialise everything and actually load the stream. By adding an onloadmetadata event listener to the video element that resolves our promise, we can ensure we don't use the video before it is ready. Once all that's set up, it's time to add the stream to the video by assigning it to the video element's srcObject property.
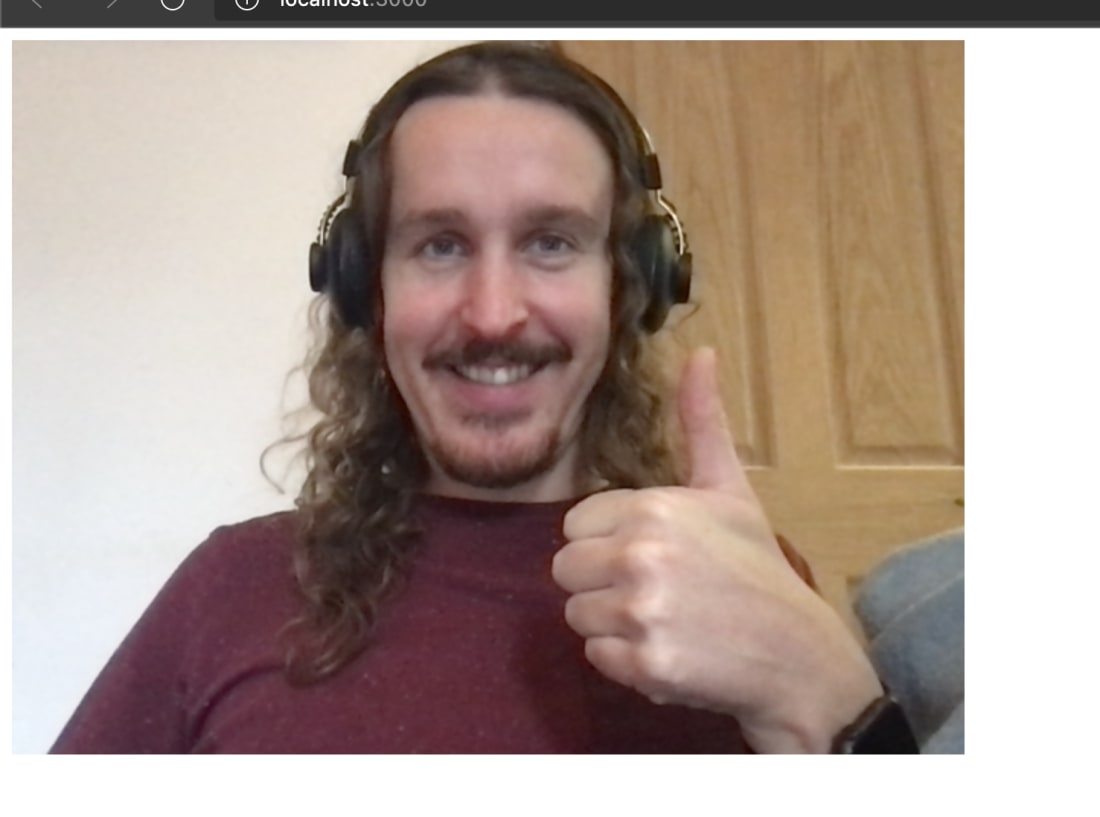
Hopefully, by this point, you should be seeing your face appearing on the page!
Drawing on top of the video with canvas
Displaying the webcam feed is excellent, but we need to start thinking about manipulating and adding to it. Our goal is to superimpose a skeleton on top of the feed, so we need to draw images on top of it.
Canvas is the perfect tool for the job here. We can add a new canvas element and position it precisely over the top of the video.
Modify index.html to look like the following:
We have added a wrapper div around the video element. This is so we can position the canvas element absolutely on top of the video. To do that we need to add some css:
Finally, let's get a reference to the canvas element and get a rendering context so that we can use it later.
Pose detection with TensorFlow.js and BlazePose
Ok, here comes the fun part! Now that our webcam is up and running and we have a way to draw over the top of the video feed, it's time to use AI to analyse the video feed and detect any poses skeletons within the video.
At this point your might be thinking: "Jozef, I am just a lowly frontend developer. Don't I need to be genius AI, machine learning guru to be able to do pose detection?" That's very humble of you but don't put yourself down like that! TensorFlow.js make all of this very clever AI stuff extremely accessible to any frontend developer!
TensorFlow.js is a library that enables machine learning within the browser. There are loads of pre-built models that can achieve all sorts of tasks from object detection to speech recognition, and thankfully for us, pose detection. You can take a look at the available models here: https://www.tensorflow.org/js/models
In addition to the pre-built models, you can train your own, but let's save that for another article!
As you can see, they have 3 models to choose from, each of which has pros and cons. We decided to go with BlazePose because we found it to have good performance, and it provides additional tracking points that could be useful.
Let's install the TensorFlow.js dependencies so we can use it in our project.
Note we have locked the TensorFlow dependencies to 3.8.0 because there were issues with later versions.
Now that we have got TensforFlow.js installed let's update src/main.ts to make use of the new packages and start pose detecting!
Let's talk through the changes here. Firstly at the top of the file, you can see the new imports. We import the pose detection library and the WebGL backend for TensorFlow.js. This allows TensorFlow.js to run on the graphics processor resulting in much faster performance than running on the CPU.
The next addition is the initPoseDetection function. Here we chose BlazePose as a model of choice, and then we instantiated a new detector using the BlazePose model. When doing this, we pass a config object allowing us to customise how the model will run.
We set the runtime attribute to "tfjs". This tells the detector to use TensorFlow.js (you can also use something called MediaPipe, but the performance varies massively between browsers).
The model attribute is set to "lite". There are three types of BlazePose model to choose from, "lite", "full", and "heavy". These change the quality of the detection model. Lite has the least accurate detection but is the best performing, whilst "heavy" has the best accuracy but is very performance-intensive, and "full" is somewhere in the middle. We have chosen "lite" because we want this to work in real-time and on weaker devices if possible.
In case you hadn't guessed, maxPoses specifies how many poses the detector should search for. But, again, for the sake of performance, we are limiting it to one.
The start function has been updated to create our pose skeleton detector after the camera is initialised, and we have also added a new render function. We will detect the poses on each video frame and eventually draw them to the canvas. For the time being, we are just detecting the poses with the line:
How easy is that! You just pass the estimatePoses function your video element, a lot of AI magic happens in the background, and before you know it, you'll have a nice array of poses.
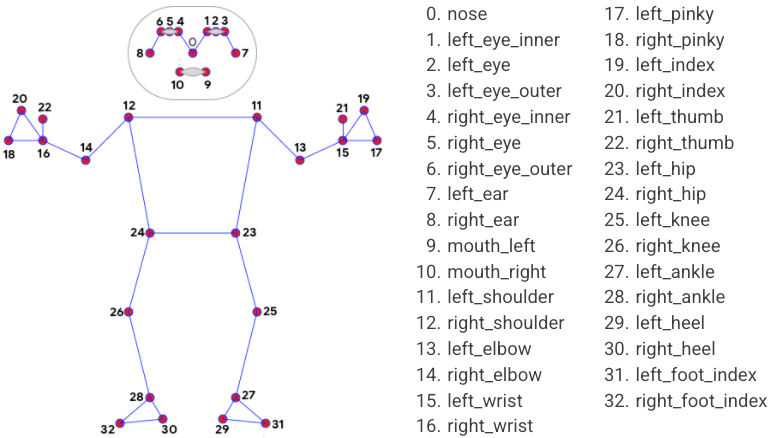
If you look in your console now, you should see s steady stream of pose arrays logging into your console. If you open one of them out and look inside, it should look something a bit like this:
The top-level score property is the confidence that a pose is actually in the frame. After that, we have keypoints. These contain the coordinates of all the bits of your body. Let's just stop a second and think about how amazing it is that you can get to this point entirely in the browser!
Not so long ago, pose tracking like this would require one of those ridiculous bobble suits and a costly camera set up like you see when CGI scenes are being recorded at the movies. Now you can get pretty good results with your selfie cam and Google Chrome!
Drawing the detected pose
It's about time we start putting all this clever AI to use and drawing our skeleton. For a simple first step, we will attempt the hello world of "skeletonising" and mark the components of our head using simple dots and lines.
To do this, we can create a new "Skeleton" class that will handle the drawing of each body part. For the time being, we will only draw the head. The start of our Skeleton class can be seen below:
So here you can see we have a class with two methods. When we instantiate a new Skeleton, we will pass it to the canvas rendering context via the constructor. This will allow the Skeleton to use it later so it can draw the skeleton parts.
Next, we have the drawHead method. As you have probably guessed, this will be responsible for rendering the head. Eventually, we will have a function for each body part, but the head is enough to get things started.
Each time the drawHead method is called, we will pass it the current pose object from BlazePose. At the beginning of the function, we find each key point that makes up the head.
Once we have the key points, we then go about drawing them. For the eyes and nose, we draw a simple circle at their coordinates. For the mouth, we draw a line between the left and right sides of the mouth.
We can now update main.ts to create a new Skeleton and call its draw function on render.
You should now have something that looks a bit like this:
The pose detection is working! Of course, the code we have just written to draw the head will be replaced, but it's good to see visual proof that the pose detection is working as it should.
Mapping images to body parts
So as you can see, drawing dots and lines over the pose key points is very easy. Unfortunately, dots and lines make a pretty awful Halloween costume, so replacing them with illustrated skeleton pieces would be better.
We got a skeleton illustration and separated all the body parts and exported them, individual, from Figma. Here is our skeleton:
To map an image to the correct position, there are a few things we need to work out.
The position of the image. It's x and y coordinates.
The angle of the image. Do we need to rotate it to fit correctly?
The height and width. Do we need to scale it horizontally or vertically?
For the head, we can use the nose keypoint as the central coordinates.
To figure out the rotation, we can calculate the angle between the two eye key points.
Finally, to figure out the horizontal scale, we can calculate the distance between the eyes and then compare it to the actual distance between the eyes in our head image.
We can do the same for the horizontal scale by measuring the height between the mouth and the eyes.
All of the above can be worked out using Vector math. We have created a small helper file to do this:
Our vector helper file can now be used in the Skeleton draw functions to figure out the image positioning:
There's quite a lot of changes here so let's go through them. Starting at the top of the file we import our shiny new vector helpers. We also import the image that will be used for our head, and create a new Image and set its src. This will allow us to draw it to the canvas with drawImage later.
Moving on to the drawHead function:
Here you can see we have gotten rid of the quick dot/line drawing and replaced it with a lot of maths! We have two constants for the eye width and the eye to mouth height.
These are the actual pixel distance between the eyes and the eyes to mouth in Head.png, and we can use these to scale our image relative to the lengths in the detected pose.
We work out the rotation for the head image by getting the angle between the two eye keypoints:
The x-axis scale is worked out by measuring the distance between the two eye key points and then dividing it by the real pixel width:
We can then do something similar to figure out the y-axis scale:
The only difference here is that we find the middle point between the eyes and the central point between both sides of the mouth and then calculate the height.
Now that all the maths is done, its time to draw the head image to the canvas.
We are using another new function on the Skeleton class here called drawImage, which we will talk about in a bit. Still, for the time being, you can see that we are using the variables we calculated above to position, scale and rotate the image correctly.
Now back to the Skeleton's drawImage function.
This function allows us to draw an image and rotate it around an anchor point of our choosing. By default, the canvas drawImage function will position an image from its top-left coordinate. Unfortunately, this makes it awkward for us to position and rotate the image to match the pose.
Using the canvas translate and rotate functions before drawing the image allows us to position it and rotate how we need to.
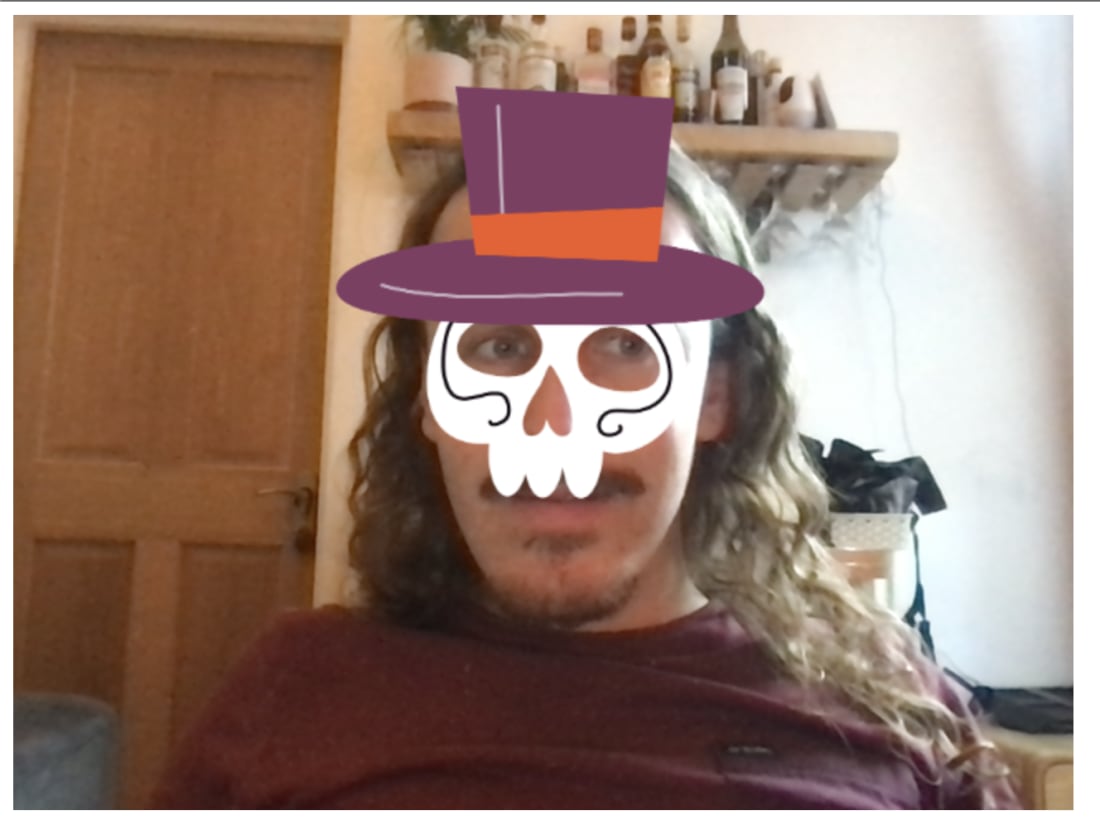
Hopefully, by this point, you are starting to look a bit sillier like I am below:
Where's my body?
We've got a lovely looking skeleton skull, but we are still missing a lot of bones. Luckily we now have everything in place to draw the rest of the body. We need to create draw functions for each of the other body parts. I won't copy all the draw functions here because there are loads of them, but if you want to see them all, check them out on the repo: https://github.com/pixelhop/skeletoniser/blob/main/src/skeleton.ts
Happy Halloween 🎃
We hope you enjoyed this post and have been able to adequately skeletonise yourself as a result! We love projects that are a bit of fun like this and can't wait to keep experimenting.
As always, if you enjoyed this post or have any questions feel free to reach out to us on Twitter: @pixelhopio or subscribe to our newsletter to be kept up to date with what ever crazy things we build next!
In this blog post, we will pull out some of the design elements and animations and talk about them. We really enjoyed this project because it allowed us to add in many fun things; we added a lot of animations to give that extra special ingredient in our cauldron to make it a potent potion.
Create a mouse tracking eye using Vue 3, VueUse & CSS
In this blog, I will be showing you how to make a mouse-tracking eye component using Vue 3, VueUse and a sprinkle of CSS. This eye-catching component will make a quirky addition to your future projects.
We loved Notion, until the agent era made it feel too slow, closed, and awkward to work with. Treehouse is our attempt to keep the polish of Notion, combine it with the freedom of Dropbox, and make a workspace that humans and AI agents can share properly.